

The Art of Sanding in Wood Statue Crafting

The Art of Sanding in Wood Statue Crafting
Wooden statues have always held a timeless allure, captivating art enthusiasts for generations. Wood carving is an intricate craft, deeply ingrained in human history. Within this craft, the process of sanding plays a pivotal role, whether you're an experienced woodcarver or just starting out. Sanding not only smoothest the wood's surface but also elevates the intricate details of the wood grain, revealing its natural beauty. In this comprehensive guide, we will delve into the significance of sanding in the wood statue crafting process, the essential tools and materials, and provide a step-by-step procedure to help you achieve a flawless finish.
The Significance of Sanding in Wood Statue Crafting
Sanding is a critical step in the creation of wooden statues for several compelling reasons. Firstly, it eliminates rough patches, imperfections, and tool marks left behind during the carving process. This results in a surface that is exceptionally smooth and free from any blemishes, ensuring a polished and professional appearance.


Before Sanding Process
.Secondly, sanding is vital for refining the finer details of the statue. It empowers artists to bring out intricate features like facial expressions, clothing textures, and ornamental designs. Sanding grants artists greater control over the statue's final appearance, enabling precision and artistic expression.
Thirdly, sanding plays a significant role in preparing the wood for finishing. Whether you plan to paint, stain, or apply a natural wood finish, a well-sanded surface provides an ideal canvas for these applications. It facilitates even and beautiful adhesion of the finish, resulting in a visually captivating final product.
Essential Tools and Materials
Before embarking on the sanding process, it is imperative to gather the necessary tools and materials. Here's a comprehensive list of items you'll need:
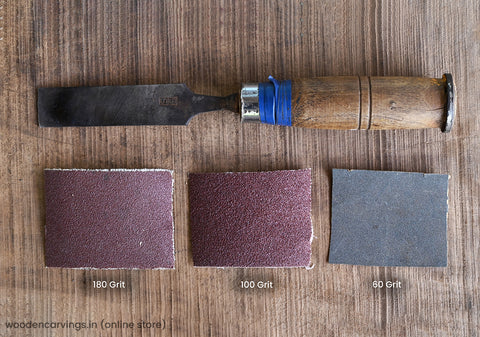
- Sandpaper: Sandpaper comes in various grits, ranging from coarse to fine. For wood statue crafting, you'll typically require a range of grits, starting from coarse (around 80 grits) for initial shaping and progressing to finer grits (up to 400 or higher) for smoothing and finishing.
- Sanding Blocks: Sanding blocks provide a flat, even surface to hold the sandpaper and apply consistent pressure. These blocks can be crafted from wood, foam, or rubber.
- Sanding Sponges: Sanding sponges are versatile and particularly useful for sanding curved or contoured areas of the statue.
- Dust Mask and Safety Glasses: Sanding generates fine wood dust that can be harmful if inhaled. Prioritize your safety by wearing a dust mask and safety glasses.
- Workbench or Table: A stable work surface is essential to securely hold the statue during the sanding process.
- Clamp or Vise: A clamp or vise can prove invaluable in holding the statue firmly in place, ensuring stability and precision.
Step-by-Step Sanding Procedure
Sanding is a foundational step in woodworking, DIY projects, and furniture refinishing, indispensable for achieving a smooth and polished finish. Follow this step-by-step guide to ensure your wooden statue attains its optimal appearance. Start by gathering your tools: select the appropriate grit of sandpaper, acquire a sanding block, and consider using an electric sander for larger statues. Here's how the process unfolds:
- Initial Shaping: Commence with coarse-grit sandpaper (approximately 80 grit) to eliminate any rough areas or tool marks left behind during the carving process. Always sand along the grain of the wood, employing even and controlled strokes. Exercise patience and take your time to attain the desired shape and smoothness.
-
Progressive Sanding: Gradually transition to finer grits of sandpaper (e.g., 120, 220, 320) as you refine the surface. Each finer grit further smooths the wood and eradicates scratches from the previous grit. Always adhere to the grain direction to prevent cross-grain scratches.
-
Sanding Detail Areas: For intricate details and hard-to-reach spots, utilize sanding sponges or small pieces of sandpaper. These tools enable you to meticulously work on curves and crevices without compromising the statue's fine features.

- Inspect and Repeat: Periodically inspect the surface for any remaining imperfections, scratches, or rough spots. If any are found, repeat the sanding process with the appropriate grits until the surface is uniformly smooth and devoid of flaws.
- Final Sanding: Conclude the sanding process with the finest grit (e.g., 400 or higher) to achieve a glass-smooth surface. This preparatory step readies the wood for finishing.
- Dust Removal: Following sanding, it's imperative to eliminate all wood dust. Employ a brush, compressed air, or a tack cloth to ensure the surface is clean and primed for finishing.
- Applying Finish: With the wooden statue now impeccably sanded, you can proceed to apply your chosen finish, be it clear varnish, wood stain, or paint. The smooth surface will absorb the finish evenly, enhancing the wood's innate beauty.
In conclusion, sanding stands as an indispensable step in the craft of wood statue making, enabling artists to transform raw wood into exquisite works of art. Through careful selection of sandpaper grits and a systematic sanding procedure, you can achieve a flawless finish that accentuates the fine details and brings forth the inherent beauty of the wood grain.
Patience and precision are the key to creating stunning wood statues that will endure the test of time.